microsoft ms-203 practice test
Microsoft 365 Messaging
Note: Test Case questions are at the end of the exam
Question 1 Topic 1, Case Study 1Case Study Question View Case
HOTSPOT
You need to modify FilesPolicy to prevent users from downloading ASPX files. The solution must meet the technical
requirements.
How should you complete the command? To answer, select the appropriate options in the answer area.
NOTE: Each correct selection is worth one point.
Hot Area:
Answer:

Explanation:
Reference:
https://docs.microsoft.com/en-us/powershell/module/exchange/set-owamailboxpolicy? view=exchange-ps
Question 2 Topic 1, Case Study 1Case Study Question View Case
HOTSPOT
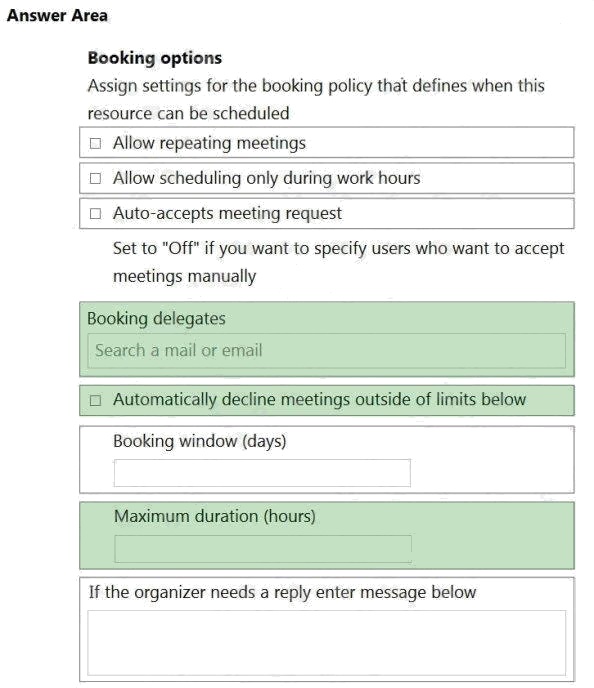
You need to configure the new smartboard to support the planned changes.
Which three settings should you configure? To answer, select the appropriate settings in the answer area.
NOTE: Each correct selection is worth one point.
Hot Area: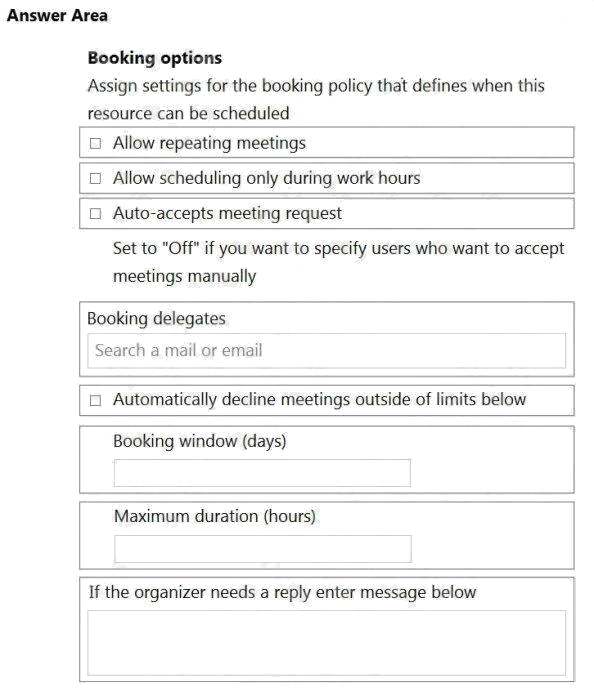
Answer:
Explanation:
Reference: https://docs.microsoft.com/en-us/exchange/recipients-in-exchange-online/manage-resourcemailboxes
Question 3 Topic 1, Case Study 1Case Study Question View Case
You need to generate a report for the mobile devices that meets the technical requirements.
Which PowerShell cmdlet should you use?
- A. Get-DevicePolicy
- B. Get-MobileDevice
- C. Get-MobileDeviceStatistics
- D. Get-DeviceTenantPolicy
Answer:
B
Explanation:
Reference: https://docs.microsoft.com/en-us/powershell/module/exchange/get-mobiledevice?view=exchange-ps
Question 4 Topic 1, Case Study 1Case Study Question View Case
HOTSPOT
You need to perform a remote wipe of the devices of User2 and User3.
You run the following commands.
Clear-MobileDevice -id User2-Device
-NotificationEmailAddress "[email protected]"
Clear-MobileDevice -id User3-Device
-NotificationEmailAddress "[email protected]"
What occurs on each device? To answer, select the appropriate options in the answer area.
NOTE: Each correct selection is worth one point.
Hot Area: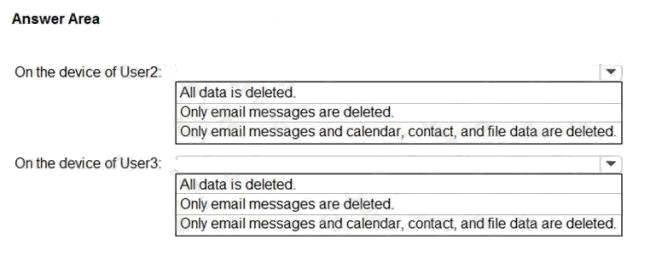
Answer:

Explanation:
Reference: https://docs.microsoft.com/en-us/exchange/clients/exchange-activesync/remote-wipe?view=exchserver-2019
Question 5 Topic 1, Case Study 1Case Study Question View Case
User3 leaves the company.
You need to ensure that Admin1 and Admin2 can access the mailbox of User3. The solution must meet the technical
requirements.
What should you do?
- A. Migrate the mailbox of User3 to a distribution group.
- B. Migrate the mailbox of User3 to a Microsoft 365 group.
- C. Convert the mailbox of User3 into a resource mailbox.
- D. Convert the mailbox of User3 into a shared mailbox.
Answer:
D
Explanation:
Fabrikam identifies the following technical requirements:
When users leave the company, remove their licenses and ensure that their mailbox is accessible to Admin1 and Admin2.
If you remove the license from User3, the mailbox will be deleted after 30 days. Converting the mailbox to a shared mailbox
will ensure that the mailbox is not deleted. You would still need to give Admin1 and Admin2 permissions to access the
mailbox.
Reference: https://docs.microsoft.com/en-us/microsoft-365/admin/email/convert-user-mailbox-to-shared-
mailbox?view=o365-worldwide
Question 6 Topic 1, Case Study 1Case Study Question View Case
HOTSPOT
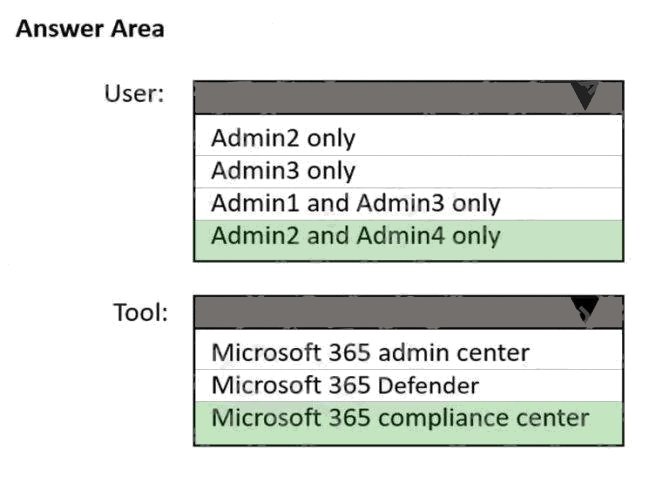
You need to ensure that In-Place Archiving is enabled for the marketing department users.
Which user should perform the change, and which tool should the user use? To answer, select the appropriate options in the
answer area.
NOTE: Each correct selection is worth one point.
Hot Area: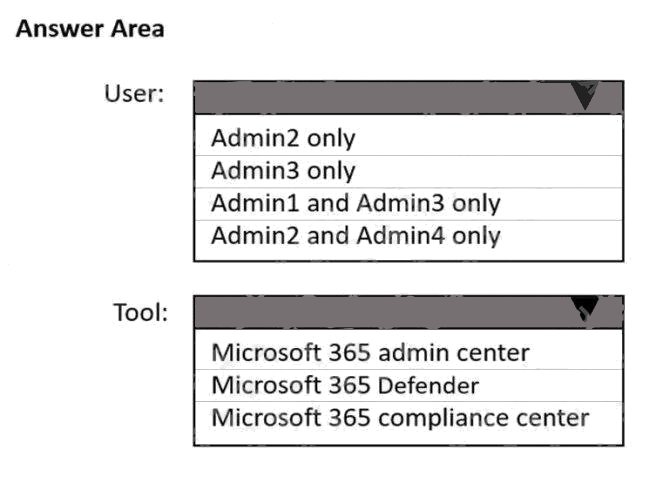
Answer:
Explanation:
Reference: https://docs.microsoft.com/en-us/microsoft-365/compliance/enable-archive-mailboxes?view=o365-worldwide
Question 7 Topic 2, Case Study 2Case Study Question View Case
Which contacts can sign in to and access resources in the adatum.com tenant?
- A. Contact1 only
- B. Contact2 only
- C. Contact1 and Contact3 only
- D. Contact2 and Contact3 only
- E. Contact1, Contact2, and Contact3
Answer:
D
Question 8 Topic 2, Case Study 2Case Study Question View Case
Lynne Robbins and the users in the sales department plan to collaborate on a project with a partner company named
Contoso, Ltd. that has an email domain named contoso.com.
You need to ensure that only the sales department users can share all their calendar free/busy information with the users in
contoso.com.
How should you configure the organization relationship?
- A. Select Calendar free/busy information with time only and enter Group1.
- B. Select Calendar free/busy information with time, subject, and location and enter Group2.
- C. Select Calendar free/busy information with time, subject, and location and enter Group3.
- D. Select Calendar free/busy information with time only and enter Group3.
- E. Select Calendar free/busy information with time only and enter Group2.
Answer:
C
Explanation:
Reference: https://docs.microsoft.com/en-us/exchange/sharing/organization-relationships/create-an-organization-relationship
Question 9 Topic 2, Case Study 2Case Study Question View Case
You need to ensure that Alex Wilber can recover deleted items when using Outlook on the web.
Which two actions should you perform? Each correct answer presents a complete solution.
NOTE: Each correct selection is worth one point.
- A. Assign Sales Policy to Alex Wilbur.
- B. Modify Marketing Policy.
- C. Remove Alex Wilbur from all groups.
- D. Assign Policy2 to Alex Wilbur.
- E. Modify Policy1.
Answer:
D
Question 10 Topic 3, Case Study 3Case Study Question View Case
You discover that email messages sent to contoso.com are NOT delivered through Contoso Connector.
You need to ensure that all email sent to contoso.com is delivered through Contoso Connector.
Which connector setting should you modify?
- A. Routing
- B. Security restrictions
- C. Use of connector
- D. Status
Answer:
C
Explanation:
Reference: https://docs.microsoft.com/en-us/exchange/mail-flow-best-practices/use-connectors-to-configure-mail-flow/set-
up-connectors-for-secure-mail-flow-with-a-partner
Question 11 Topic 3, Case Study 3Case Study Question View Case
You need to ensure that Allan Deyoung can create a new public folder for the sales department.
Which two actions should you perform first? Each correct answer presents part of the solution.
NOTE: Each correct selection is worth one point.
- A. Add Allan Deyoung to the Organization Management role group
- B. Create a new public folder mailbox
- C. Add Allan Deyoung to the Recipient Management role group
- D. Create a new shared mailbox
- E. Modify Sales Policy
Answer:
A B
Explanation:
Reference: https://docs.microsoft.com/en-us/exchange/permissions-exo/feature-permissions https://docs.microsoft.com/en-
us/exchange/collaboration-exo/public-folders/set-up-public-folders
Question 12 Topic 3, Case Study 3Case Study Question View Case
Joni Sherman reports that the Microsoft Outlook client on her Windows 10 device fails to start.
You need to troubleshoot the issue.
From the device, you start the Microsoft Remote Connectivity Analyzer.
What should you run next?
- A. the Exchange ActiveSync test
- B. the Outlook Connectivity test
- C. the Service Account Access test
- D. the Microsoft Support and Recovery Assistant for Office 365 client
Answer:
D
Explanation:
Reference: https://www.sherweb.com/blog/office-365/microsoft-support-and-recovery-assistant/
Question 13 Topic 4, Case Study 4Case Study Question View Case
You need to encrypt email between Fabrikam and Litware to support the planned changes.
What should you configure in the Exchange admin center?
- A. a connector
- B. an organization relationship
- C. a sharing policy
- D. a remote domain
Answer:
A
Explanation:
Reference: https://docs.microsoft.com/en-us/exchange/mail-flow-best-practices/use-connectors-to-configure-mail-flow/set-
up-connectors-for-secure-mail-flow-with-a-partner
Question 14 Topic 4, Case Study 4Case Study Question View Case
You need to identify the contents of the FabrikamProject public folder to meet the technical requirements.
Which PowerShell cmdlet should you run?
- A. Get-PublicFolderStatistics
- B. Get-PublicFolderItemStatistics
- C. Get-PublicFolderMailboxDiagnostics
- D. Get-PublicFolder
Answer:
B
Explanation:
Reference: https://docs.microsoft.com/en-us/powershell/module/exchange/get-publicfolderitemstatistics?view=exchange-ps
Question 15 Topic 5, Case Study 5Case Study Question View Case
You need to resolve the email delivery delay issue.
What should you do?
- A. From the Security & Compliance admin center, modify the safe attachments policy.
- B. From the Exchange admin center in Exchange Online, modify the antimalware policy.
- C. From the Exchange admin center in Exchange Online, modify the spam filter policy.
- D. From the Security & Compliance admin center, create a supervision policy.
Answer:
A
Explanation:
Reference:
https://docs.microsoft.com/en-us/office365/securitycompliance/dynamic-delivery-and-previewing