microsoft mo-100 practice test
Microsoft Word (Word and Word 2019)
Question 1 Topic 1, WoodGrove Bank
In the "Banking Fees" section, convert the tab-delimited text to a two-column table. Accept the default AutoFit behavior.
Answer:
See Explanation Below For Answer
Explanation:
:
Click the Insert tab and click Table in the Table section. Select Convert Text to Table from the drop-down menu.
On the Convert Text to Table dialog box, the Number of columns should already be set to 2 if you have only one tab
between each item on each line. The Number of rows is automatically calculated.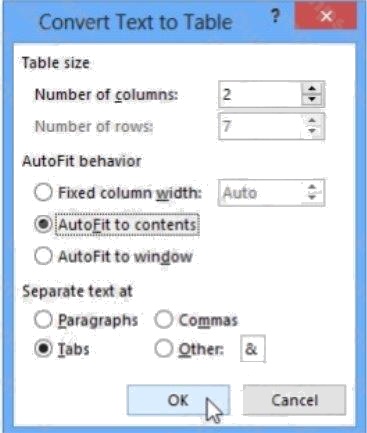
Question 2 Topic 1, WoodGrove Bank
Use a Word feature to replace all instances of " Woodgrove Basic" with Woodgrove Plus":
Answer:
See Explanation Below For Answer
Explanation:
:
Go to Home > Replace or press Ctrl+H.
Enter the word Woodgrove Basic and Replace with Woodgrove Plus
Question 3 Topic 1, WoodGrove Bank
In the "Checking Accounts' section, in the dark blue text box, insert the text "Anytime
Account Access".
Answer:
See Explanation Below For Answer
Explanation:
:
Go to Insert > Text Box.
Click in your Checking Accounts section you'd like to insert the text Anytime Account Access.
Question 4 Topic 1, WoodGrove Bank
In the blank paragraph after the document title, insert a table of contents. Use the
Automatic Table 1 style.
Answer:
See Explanation Below For Answer
Explanation:
:
References TABLE OF CONTENTS TC option Automatic Table 1
Question 5 Topic 1, WoodGrove Bank
You work for Woodgrove Bank. You are preparing a brochure that explains U.S bank account options for international
student.
Find the word ''automatic'' and delete it from the document.
Answer:
See Explanation Below For Answer
Explanation:
:
Use Ctrl+F key to and find word automatic Once find and highlighted, delete it by using delete key.
Topic 2, Contoso Pharmaceuticals
Question 6 Topic 2, Contoso Pharmaceuticals
In the "Savings Accounts" section, delete the comment that is attached to the text "$3,000".
Answer:
See Explanation Below For Answer
Explanation:
:
Click the Review tab.
Click the Next Comment or Previous Comment button to locate the offending comment. Upon success, the comment is
highlighted in the markup area.
In the Comments area, choose Delete Delete. ...
Repeat Steps 2 and 3 to remove additional comments.
Purpose
Conreleve is a new analgesic (pain reliever). Clinical trials show people tolerate this medicine an final from their pain. In 95%
of people, Conreleve worked better than a placebo. (ClinicalTrail1) 3% of people reported side effects when taking
Conreleve. Side effects Included nausea,bruising, and dizziness, (ClinicalTrail1)
History
Researchers at Contoso Pharmaceutical created the active ingredient In Conreleve four years ago, Contoso
Pharmaceuticals began clinical trails years ago, Six months ago, the government approved the use and sale of Conreleve.
Description
The medicine is packaged in a turquoise and whitecapsule.
We use the standard capsule size #1, It weight 75 mg and is 16.61 mm long. This capsule size holds to 400 mg of material.
For the inner packaging, we use a standard blister pack with an aluminum backing. For the outer packaging, we use a
standard cardboard box.
Manufacturing
Weexpect to being manufacturing the Conreleve capsules in January of next year. Weexpect to produce an initial batch of
one million units over three months. We expect to have Conreleve in stores by April of next year.
Fill Material
The fillmaterial for the conreleve capsule is weighed, then sifted and blended together. The fill material includes both active
and inactive ingredients, as shown in the next table. After the fill material is blended, It is inspected for quality control before
being encapsulated.
Capsule Material
The capsule material itself is also weighed, shifted, and blended. Capsule material is also melted, formed, and dried. It is
then inspected for quality control before encapsulating the fill material.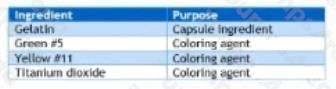
Manufacturing Process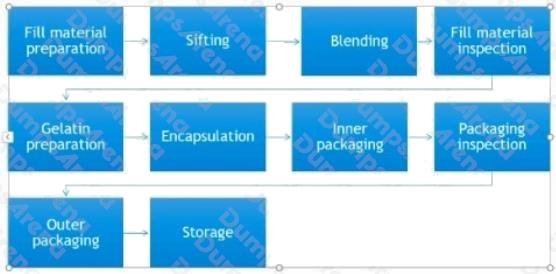
Marketing
The Contoso Pharmaceutical marketing team is finalizing its marketing plans. The team will update this documents when the
plan is complete.
Advertising
The marketing team created an advertising campaign target at radio. Expect to hear advertisements during the evening
commute on radio stations. The marketing team chose radio stations that appeals to women ages 44-55.
The marketing team is finalizing its plans for an attend the medical conference in July.
Distribution
The Contoso Pharmaceutical distribution plans to sell Conreleve at all major drug stores an grocery stores. The distribution
team is finalizing plans to offer samples of Conreleve at all public hospitals that have at least 500 beds.
Question 7 Topic 2, Contoso Pharmaceuticals
In the " Description" section, Insert a new placeholder citation with the name
"Manufacturing1" at the end of the second paragraph after the heading.
Answer:
See Explanation Below For Answer
Explanation:
:
To add a citation placeholder in Word, place your cursor at the point in your document where you want to insert the citation
placeholder. Then click the References tab in the Ribbon. Then click the Insert Citation drop-down button in the Citations
& Bibliography
Question 8 Topic 2, Contoso Pharmaceuticals
In the " Fill Material" section, resize the table so that each column is "2.2" ('5.59 cm") wide.
Answer:
See Explanation Below For Answer
Explanation:
:
Select your table.
On the Layout tab, in the Cell Size group, Resize column 2.2 wide.
Question 9 Topic 2, Contoso Pharmaceuticals
Change the orientation of only page 3 to Landscape.
Answer:
See Explanation Below For Answer
Explanation:
:
Place your cursor at the very beginning of the page that you would like to flip to landscape. ( ...
Select Layout or Page Layout > Breaks > Next Page to create a section.
Select the Page Layout tab and select Orientation > Landscape.
Question 10 Topic 2, Contoso Pharmaceuticals
In the " Description" section, use the 3D Models feature to insert the PillPack model from the 3D objects folder into the blank
paragraph.
Position the model in Line with Text.
Answer:
See Explanation Below For Answer
Explanation:
:
On the Insert tab, in the Illustrations group, click 3D Models > From a File.
Navigate to where your 3D object is, select it and click Insert.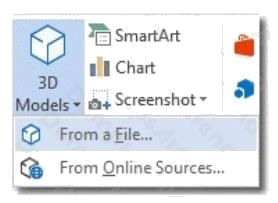
Question 11 Topic 2, Contoso Pharmaceuticals
In the " Manufacturing Process" section, assign the alt text description "Process flow" to the
SmartArt graphic, (Be sure to select the entire SmartArt graphic.)
Answer:
See Explanation Below For Answer
Explanation:
:
To add alt text in Word, open your document and select the object to which you want to add the alternative text.
Topic 3, River Cruises
Question 12 Topic 3, River Cruises
You work for Contoso Pharmaceuticals. You are creating a report that describes a new medicine.
Check the document for accessibility issues.Correctthe table-related issue reporting in the inspection results by using the
first recommended action.
Do not fix other reporting issues.
Answer:
See Explanation Below For Answer
Explanation:
:
Select File > Info.
Select the Check for Issues button.
Margies Travel
You re invited to a preview of the best in river cruising.
The preview event will feature experienced traveler and guide Pascoline Overeem, who will share highlights of last years
successful tour and provide enficing previews of the trips she is planning for this year.
Ms, Overeem will discuss tips to helps you get the most out of your travel experience, including how to take memorable
photos and create a blog to share your experiences, what to bring and how topack, and the best ways to experience a new
culture.
The event is open to everyone who has been a deposit to hold a reservation for the spring salling. There are still a few
spaces remaining so additional guests also be included if space permits. Enjoy specially prepared sample foods to whet your
oppefite for the delicious cuisine that you can expect to savor on your trip.
We hope you will join use for this fun and information event to learn about that exciting trip and get to know some of your
travel componions before the trip even begins.
Question 13 Topic 3, River Cruises
Inspect the document and remove all headers, footers, and watermarks that are found, Do not remove other information.
Answer:
See Explanation Below For Answer
Explanation:
:
From the Info pane, click on Check for Issues and then select Inspect Document from the pop-up menu. When the
Document Inspector dialog box appears, uncheck all boxes except Headers, Footers, and Watermarks. Click on Inspect.
Simply click on Remove All to delete all headers, footers and watermarks in your document
Question 14 Topic 3, River Cruises
At the end of the documents, change the line spacing of the last two paragraphs to exactly
14 pt.
Answer:
See Explanation Below For Answer
Explanation:
:
Select Last two paragraphs to update. ...
Go to Home > Line and Paragraph Spacing.
Select Line Spacing Options and choose an option in the Line spacing box.
Adjust the Before and After settings to change spacing between paragraphs.
Select OK.
Question 15 Topic 3, River Cruises
Apply the Intense Emphasis style to the paragraph after the picture.
Answer:
See Explanation Below For Answer
Explanation:
:
Select the text you want to format.
On the Home tab, point to a style to preview it.
Select a style.