linux foundation cka practice test
Certified Kubernetes Administrator
Question 1
SIMULATION
Monitor the logs of pod foo and:
Extract log lines corresponding to error
unable-to-access-website
Write them to/opt/KULM00201/foo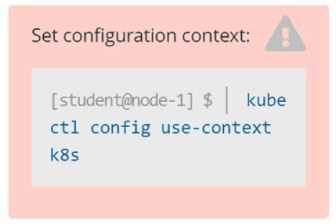
Answer:
See the
solution below.
Explanation:
solution
F:\Work\Data Entry Work\Data Entry\20200827\CKA\1 B.JPG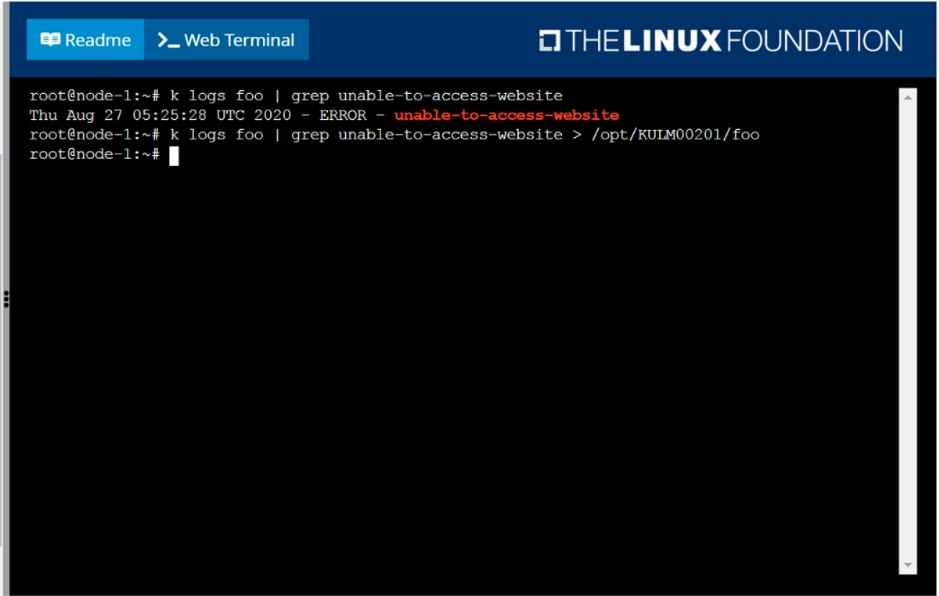
F:\Work\Data Entry Work\Data Entry\20200827\CKA\1 C.JPG
Step 0: Set the correct Kubernetes context
If you're given a specific context (k8s in this case), you must switch to it:
kubectl config use-context k8s
⚠️
Skipping this can cause you to work in the wrong cluster/namespace and cost you marks.
Step 1: Identify the namespace of the pod foo
First, check if foo is running in a specific namespace or in the default namespace.
kubectl get pods --all-namespaces | grep foo
Assume the pod is in the default namespace if no namespace is mentioned.
Step 2: Confirm pod foo exists and is running
kubectl get pod foo
You should get output similar to:
NAME READY STATUS RESTARTS AGE
foo 1/1 Running 0 1h
If the pod is not running, logs may not be available.
Step 3: View logs and filter specific error lines
We’re looking for log lines that contain:
unable-to-access-website
Command:
kubectl logs foo | grep "unable-to-access-website"
Step 4: Write the filtered log lines to a file
Redirect the output to the required path:
kubectl logs foo | grep "unable-to-access-website" > /opt/KULM00201/foo
✅
This creates or overwrites the file /opt/KULM00201/foo with the filtered logs.
You may need sudo if /opt requires elevated permissions. But in most exam environments, you're
already the root or privileged user.
Step 5: Verify the output file (optional but smart)
Check that the file was created and has the correct content:
cat /opt/KULM00201/foo
✅
Final Answer Summary:
kubectl config use-context k8s
kubectl logs foo | grep "unable-to-access-website" > /opt/KULM00201/foo
Question 2
SIMULATION
List all persistent volumes sorted by capacity, saving the full kubectl output to
/opt/KUCC00102/volume_list. Use kubectl 's own functionality for sorting the output, and do not
manipulate it any further.
Answer:
See the
solution below.
Explanation:
solution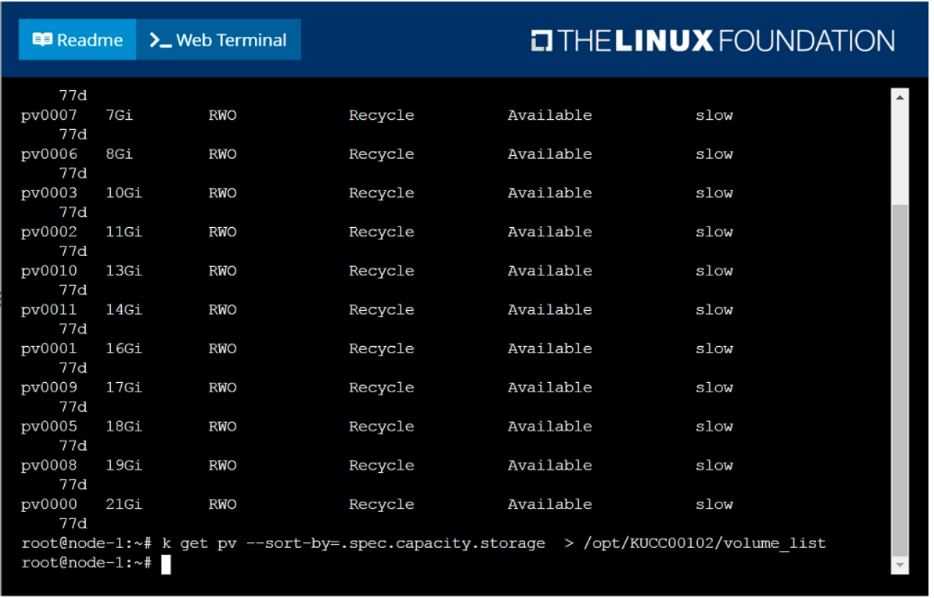
F:\Work\Data Entry Work\Data Entry\20200827\CKA\2 C.JPG
Question 3
SIMULATION
Ensure a single instance of pod nginx is running on each node of the Kubernetes cluster where nginx
also represents the Image name which has to be used. Do not override any taints currently in place.
Use DaemonSet to complete this task and use ds-kusc00201 as DaemonSet name.
Answer:
See the
solution below.
Explanation:
solution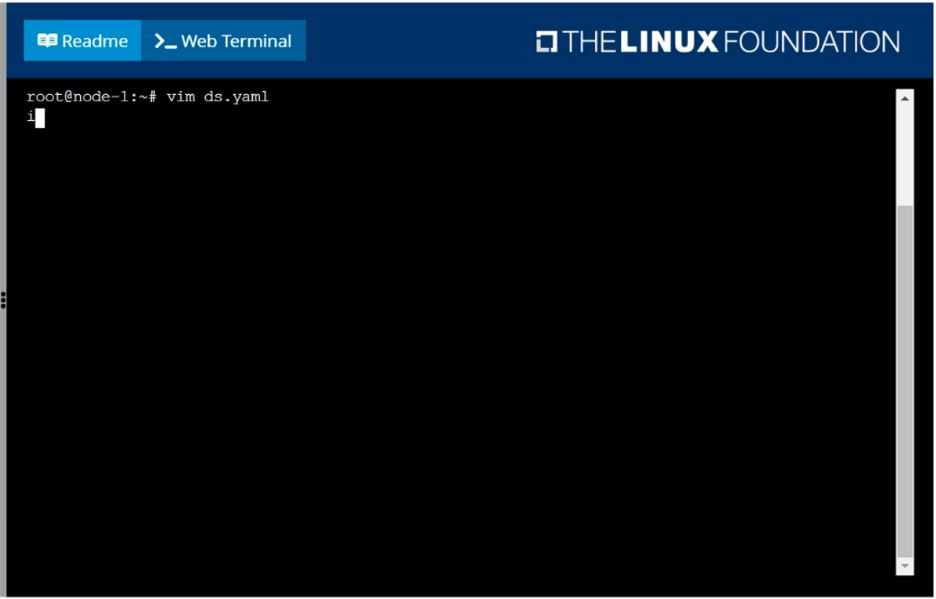
F:\Work\Data Entry Work\Data Entry\20200827\CKA\3 B.JPG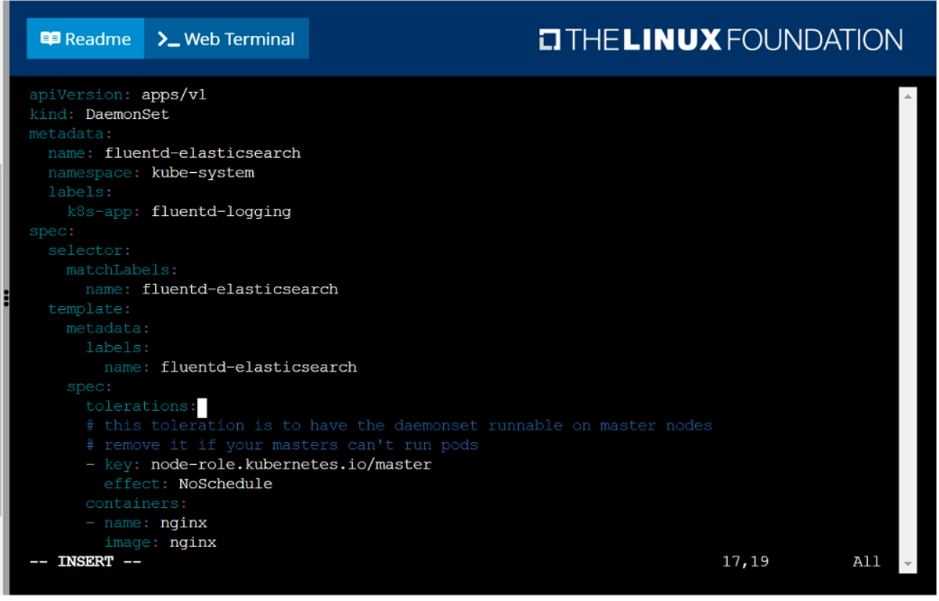
F:\Work\Data Entry Work\Data Entry\20200827\CKA\3 C.JPG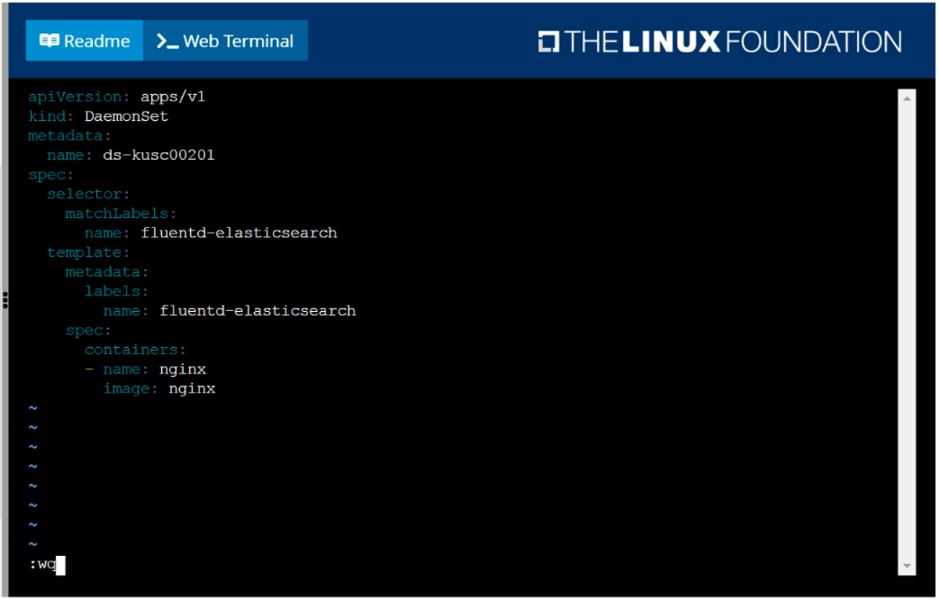
F:\Work\Data Entry Work\Data Entry\20200827\CKA\3 D.JPG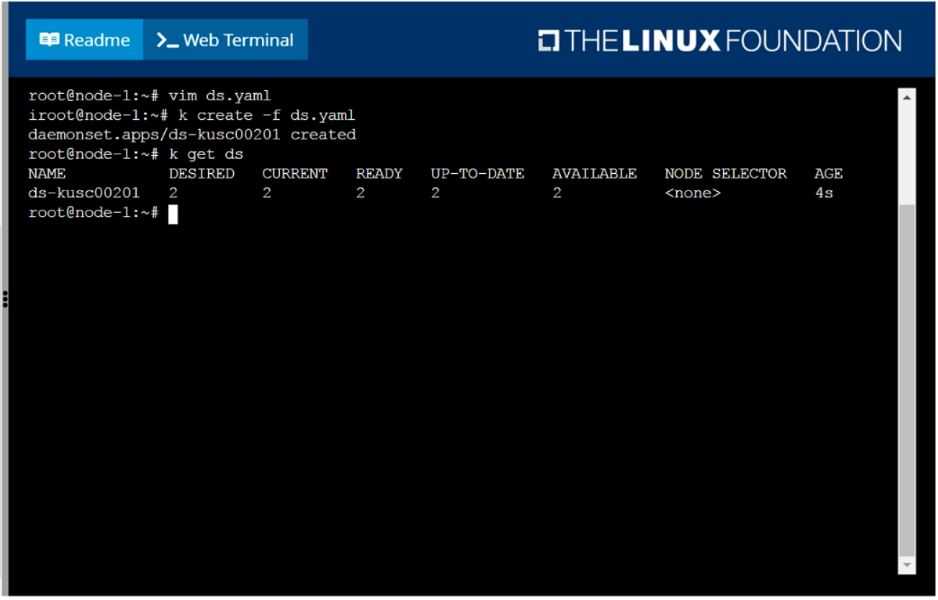
F:\Work\Data Entry Work\Data Entry\20200827\CKA\3 E.JPG
Question 4
SIMULATION
Perform the following tasks:
Add an init container to hungry-bear (which has been defined in spec file /opt/KUCC00108/pod-spec-
KUCC00108.yaml)
The init container should create an empty file named/workdir/calm.txt
If /workdir/calm.txt is not detected, the pod should exit
Once the spec file has been updated with the init container definition, the pod should be created
Answer:
See the
solution below.
Explanation:
solution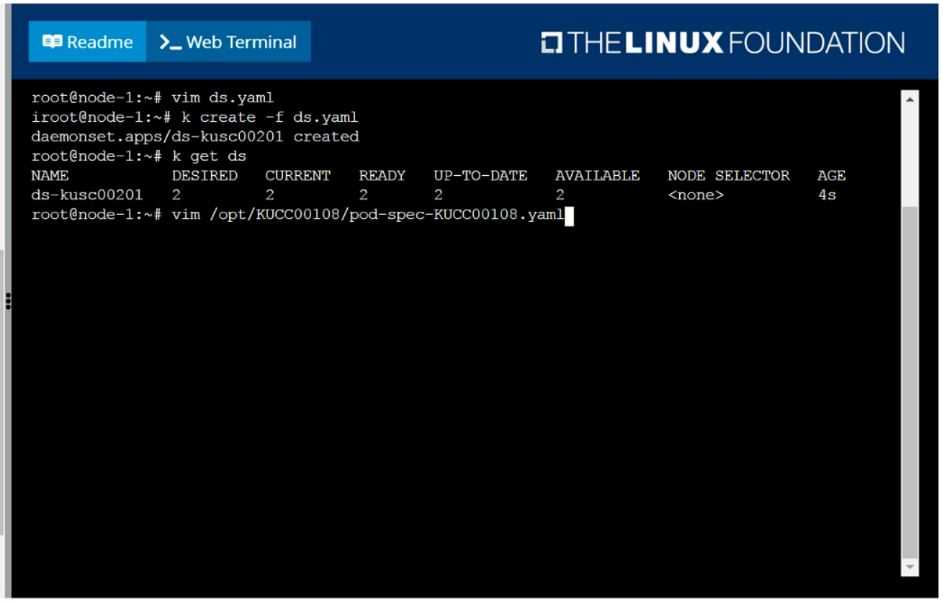
F:\Work\Data Entry Work\Data Entry\20200827\CKA\4 B.JPG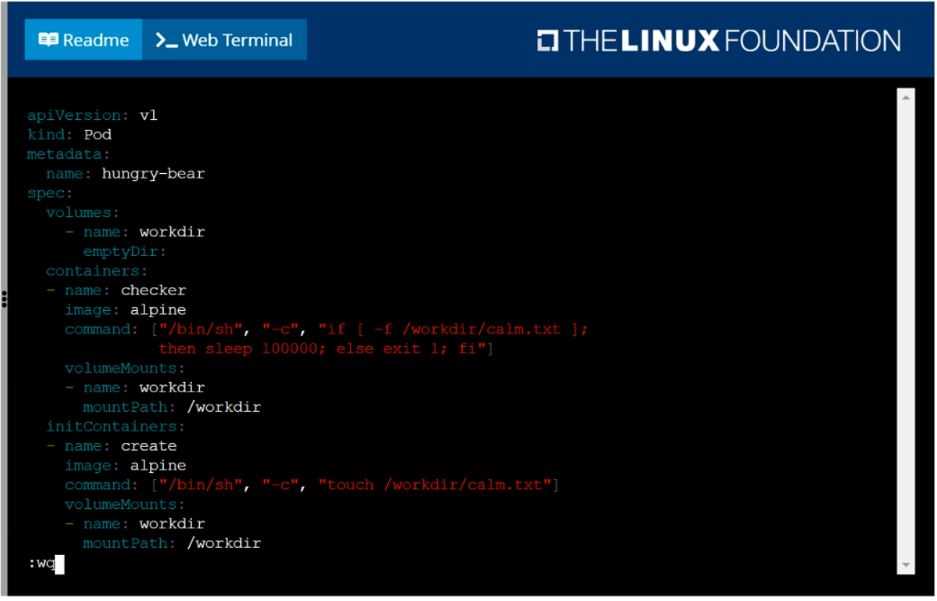
F:\Work\Data Entry Work\Data Entry\20200827\CKA\4 C.JPG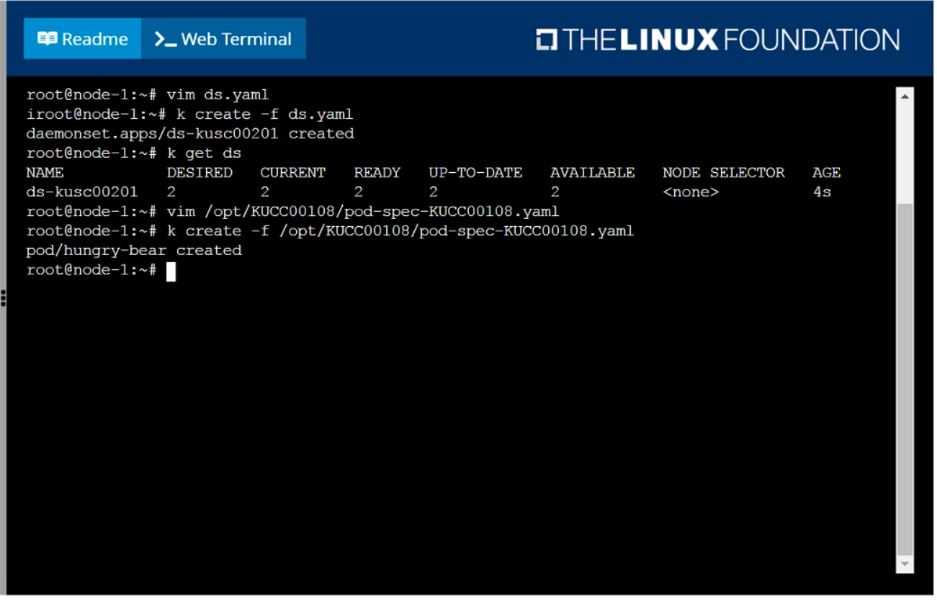
F:\Work\Data Entry Work\Data Entry\20200827\CKA\4 D.JPG
Question 5
SIMULATION
Create a pod named kucc8 with a single app container for each of the
following images running inside (there may be between 1 and 4 images specified):
nginx + redis + memcached.
Answer:
See the
solution below.
Explanation:
solution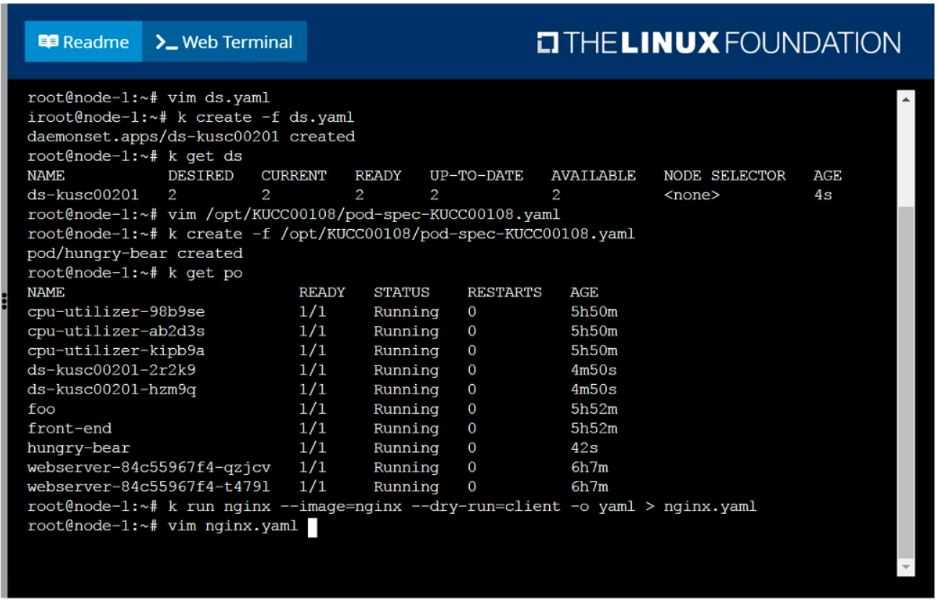
F:\Work\Data Entry Work\Data Entry\20200827\CKA\5 B.JPG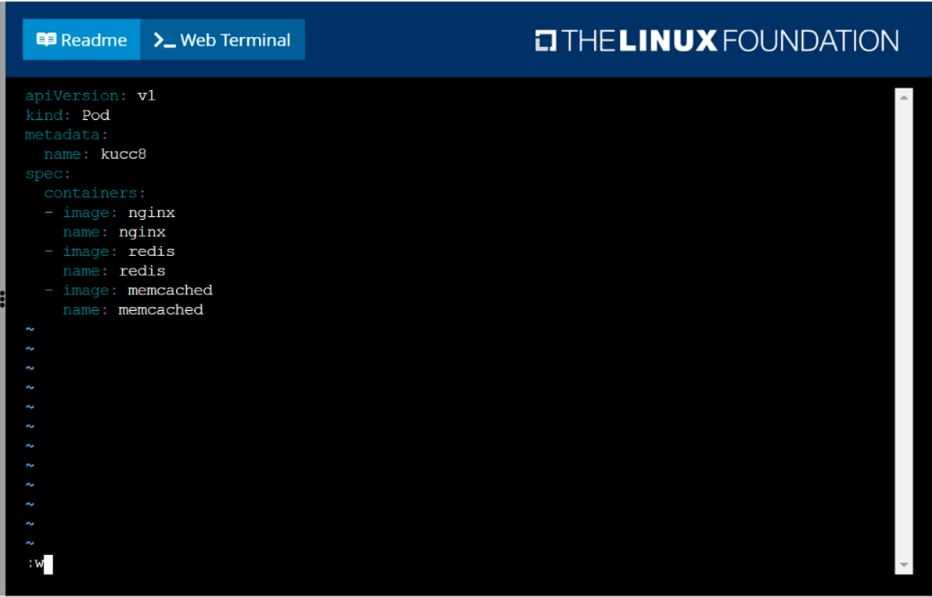
F:\Work\Data Entry Work\Data Entry\20200827\CKA\5 C.JPG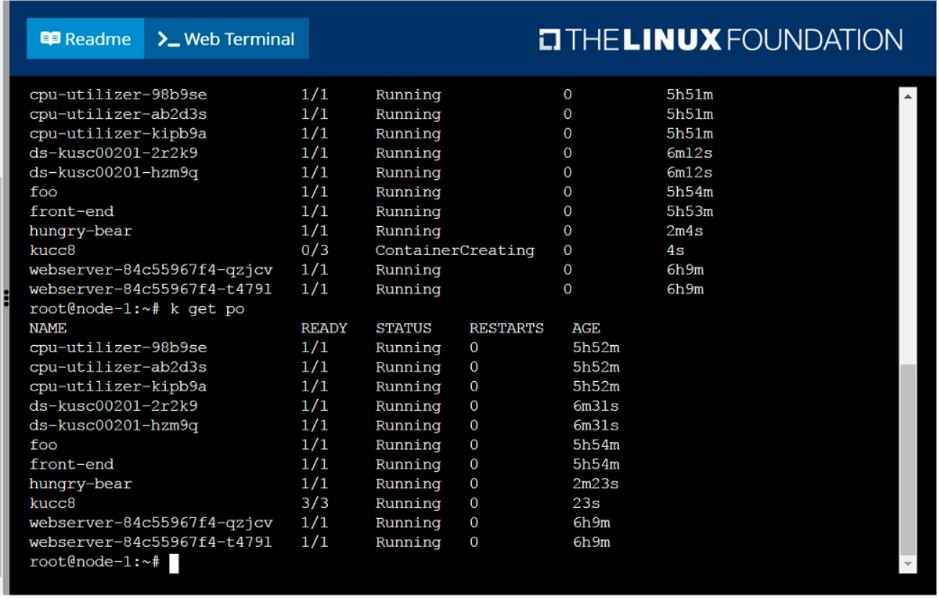
F:\Work\Data Entry Work\Data Entry\20200827\CKA\5 D.JPG
Question 6
SIMULATION
Schedule a pod as follows:
Name: nginx-kusc00101
Image: nginx
Node selector: disk=ssd
Answer:
See the
solution below.
Explanation:
solution
F:\Work\Data Entry Work\Data Entry\20200827\CKA\6 B.JPG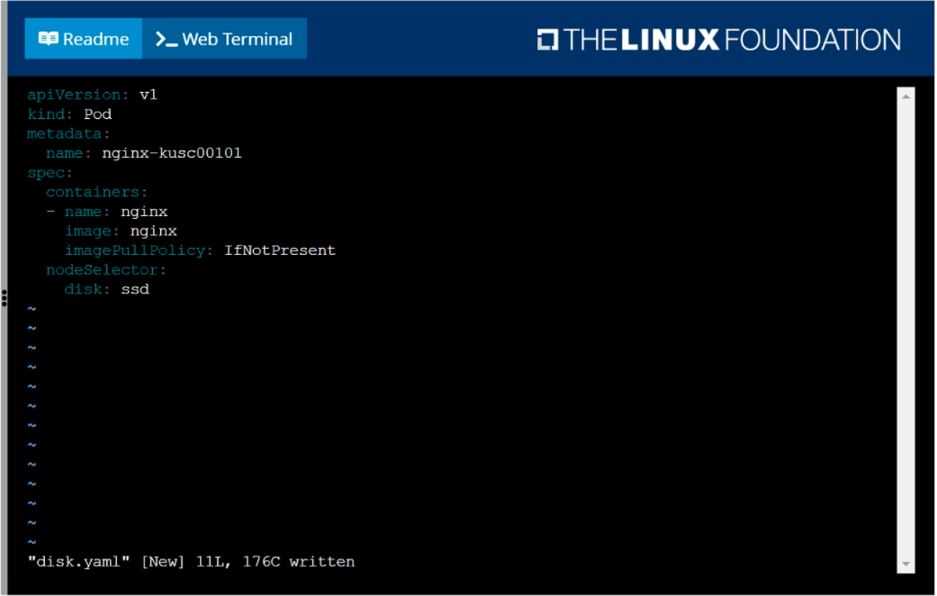
F:\Work\Data Entry Work\Data Entry\20200827\CKA\6 C.JPG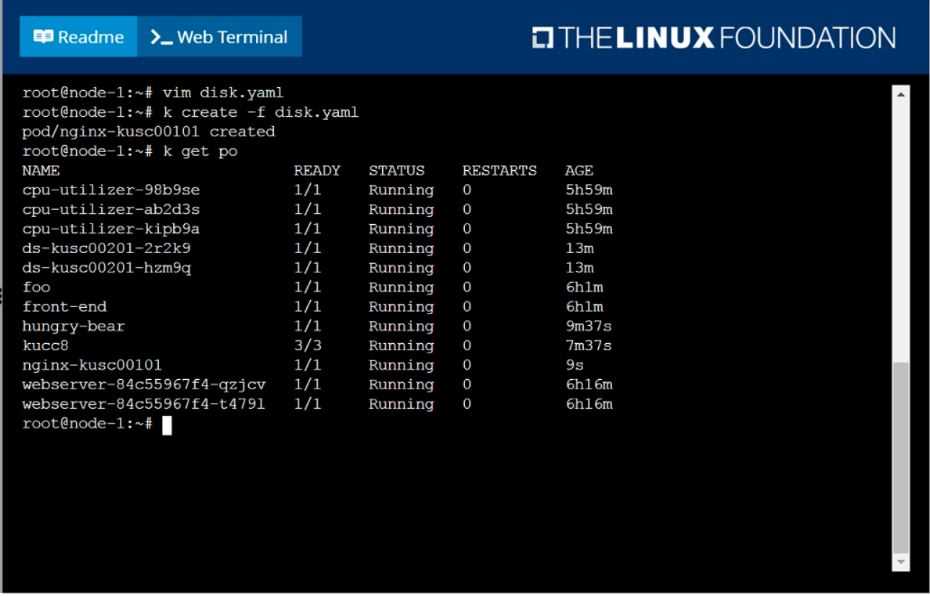
F:\Work\Data Entry Work\Data Entry\20200827\CKA\6 D.JPG
Question 7
SIMULATION
Create a deployment as follows:
Name: nginx-app
Using container nginx with version 1.11.10-alpine
The deployment should contain 3 replicas
Next, deploy the application with new version 1.11.13-alpine, by performing a rolling update.
Finally, rollback that update to the previous version 1.11.10-alpine.
Answer:
See the
solution below.
Explanation:
solution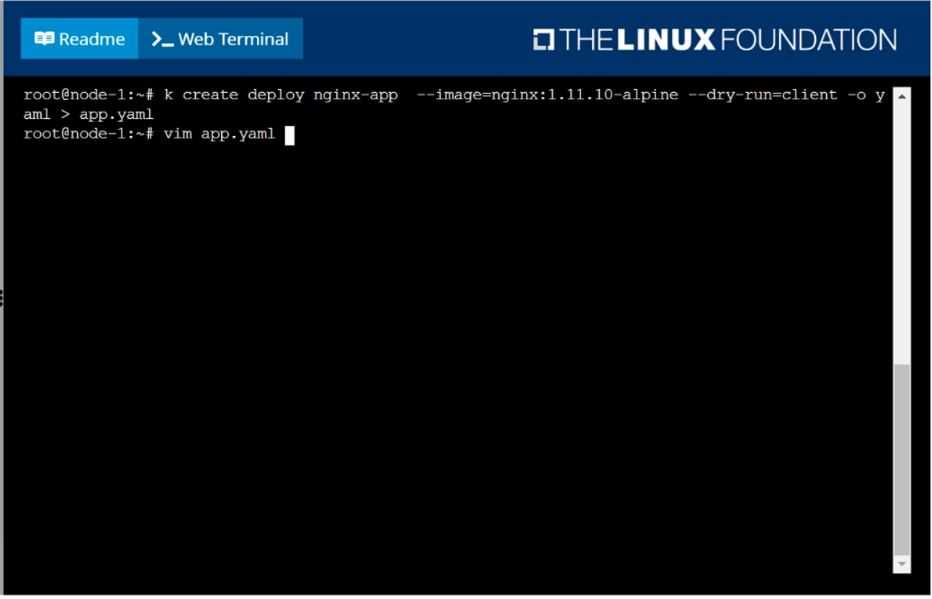
F:\Work\Data Entry Work\Data Entry\20200827\CKA\7 B.JPG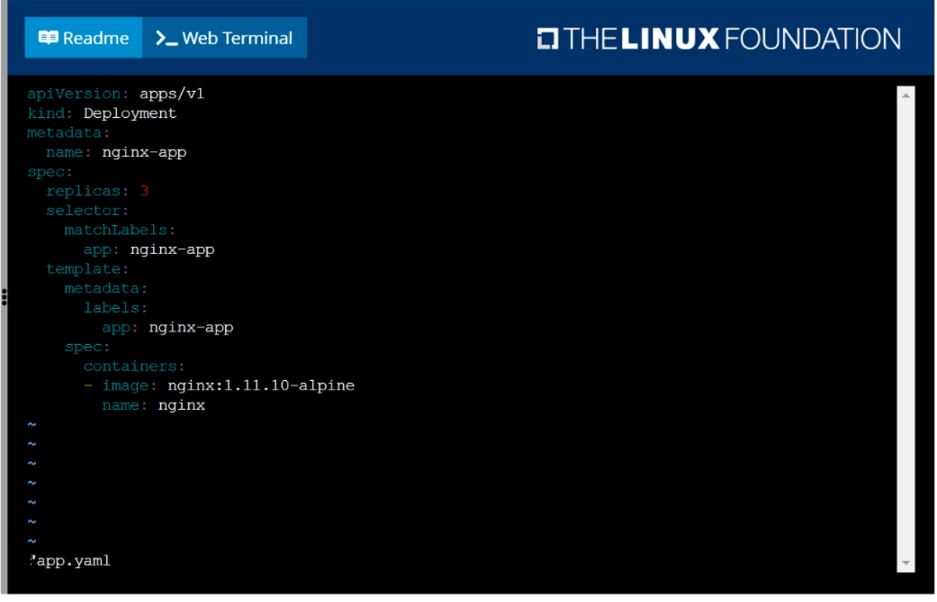
F:\Work\Data Entry Work\Data Entry\20200827\CKA\7 C.JPG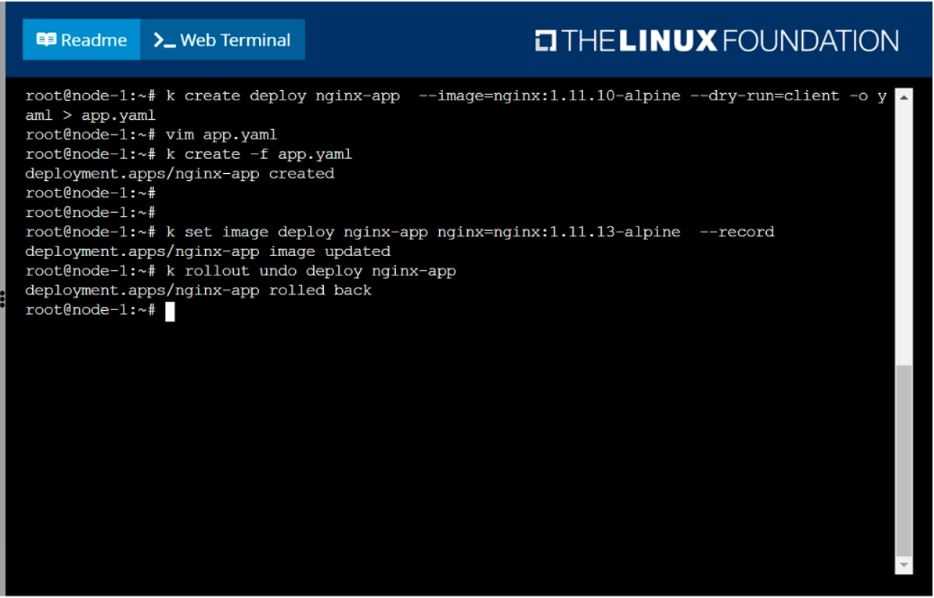
F:\Work\Data Entry Work\Data Entry\20200827\CKA\7 D.JPG
Question 8
SIMULATION
Create and configure the service front-end-service so it's accessible through NodePort and routes to
the existing pod named front-end.
Answer:
See the
solution below.
Explanation:
solution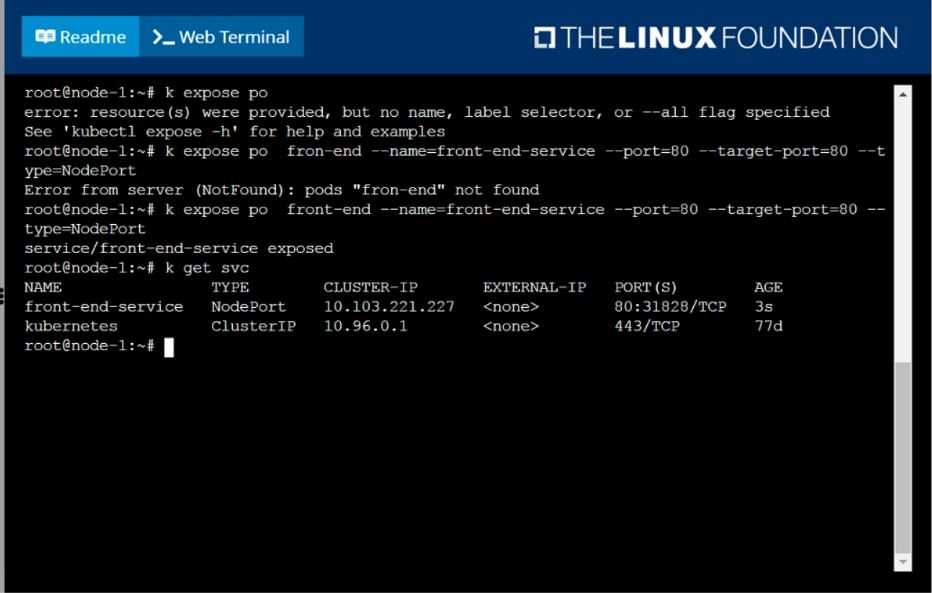
F:\Work\Data Entry Work\Data Entry\20200827\CKA\8 B.JPG
Question 9
SIMULATION
Create a pod as follows:
Name: mongo
Using Image: mongo
In a new Kubernetes namespace named: my-website
Answer:
See the
solution below.
Explanation:
solution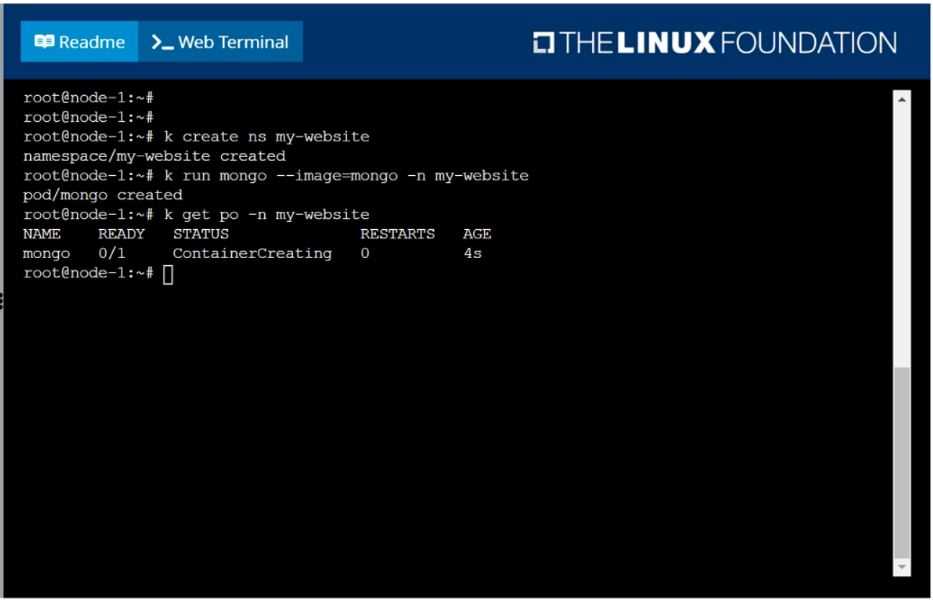
F:\Work\Data Entry Work\Data Entry\20200827\CKA\9 B.JPG
Question 10
SIMULATION
Create a deployment spec file that will:
Launch 7 replicas of the nginx Image with the labelapp_runtime_stage=dev
deployment name: kual00201
Save a copy of this spec file to /opt/KUAL00201/spec_deployment.yaml
(or /opt/KUAL00201/spec_deployment.json).
When you are done, clean up (delete) any new Kubernetes API object that you produced during this
task.
Answer:
See the
solution below.
Explanation:
solution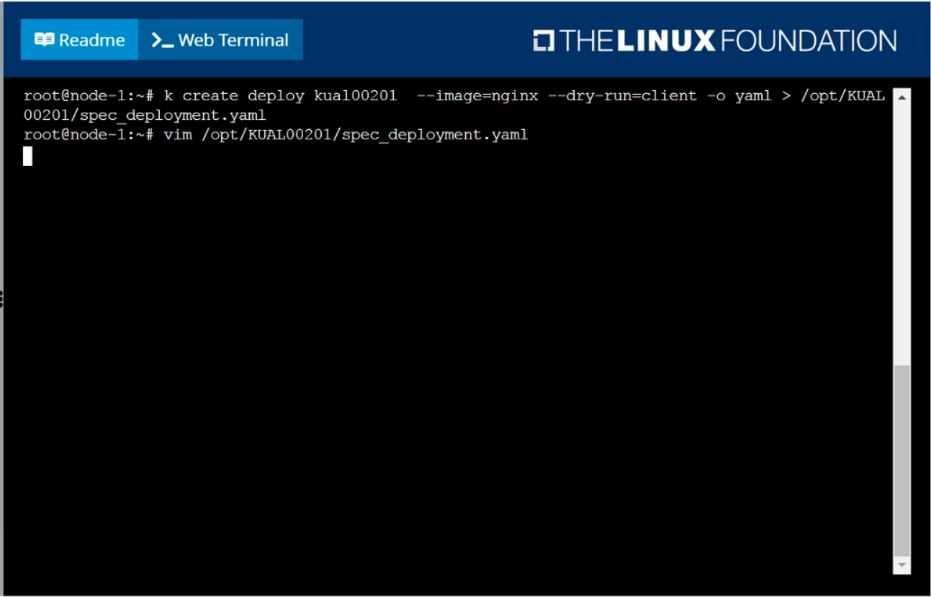
F:\Work\Data Entry Work\Data Entry\20200827\CKA\10 B.JPG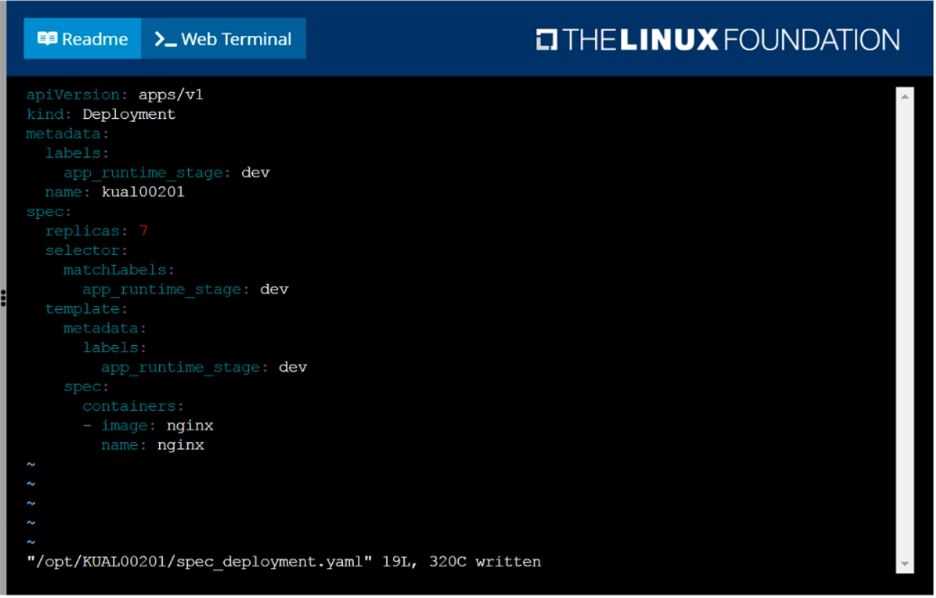
F:\Work\Data Entry Work\Data Entry\20200827\CKA\10 C.JPG
Question 11
SIMULATION
Create a file:
/opt/KUCC00302/kucc00302.txt that lists all pods that implement service baz in namespace
development.
The format of the file should be one pod name per line.
Answer:
See the
solution below.
Explanation:
solution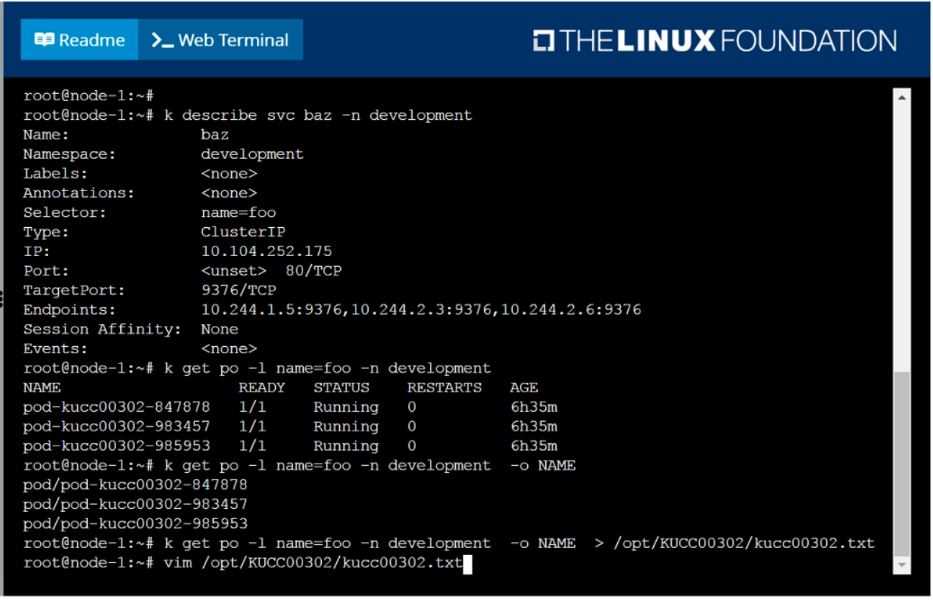
F:\Work\Data Entry Work\Data Entry\20200827\CKA\11 B.JPG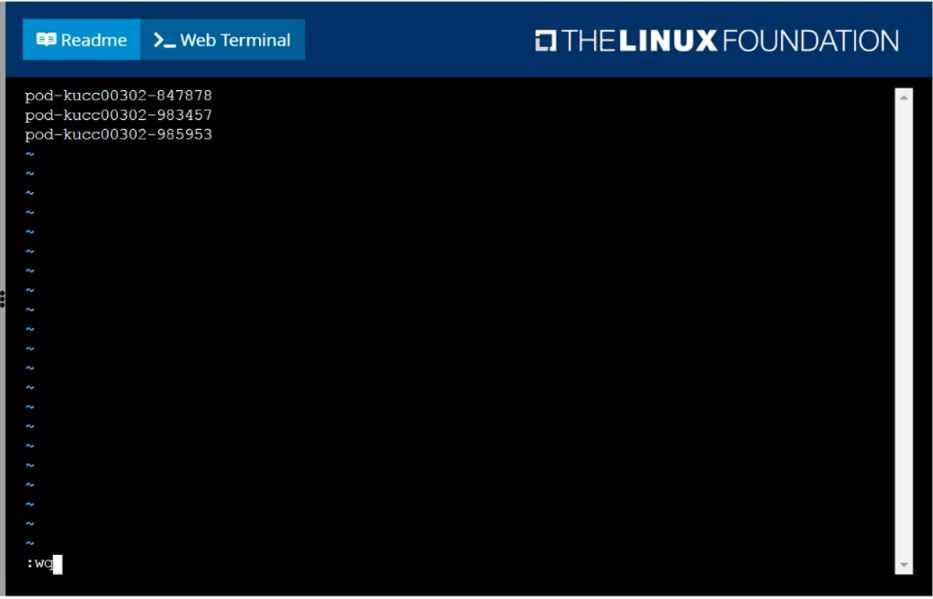
F:\Work\Data Entry Work\Data Entry\20200827\CKA\11 C.JPG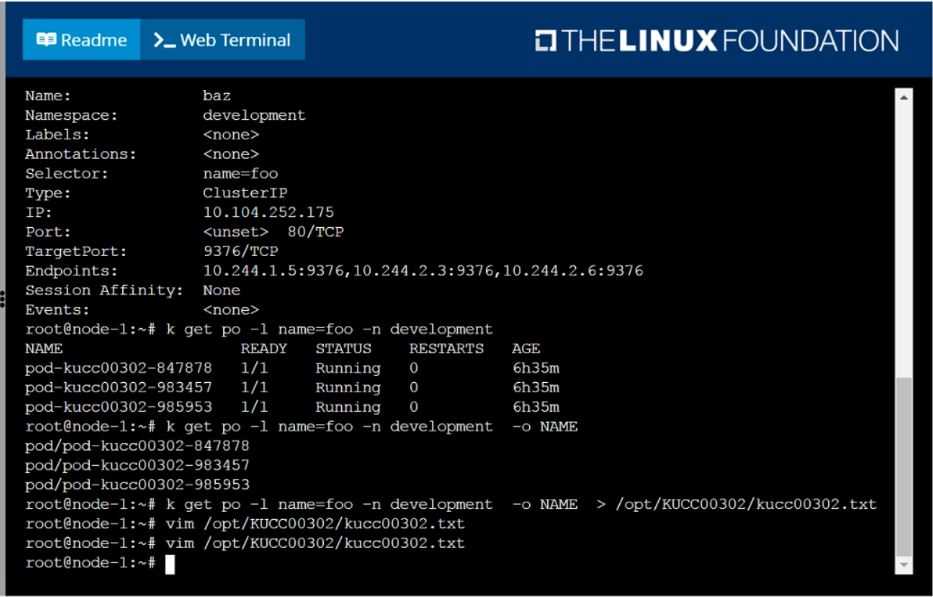
F:\Work\Data Entry Work\Data Entry\20200827\CKA\11 D.JPG
Question 12
SIMULATION
Create a Kubernetes secret as follows:
Name: super-secret
password: bob
Create a pod named pod-secrets-via-file, using the redis Image, which mounts a secret named super-
secret at /secrets.
Create a second pod named pod-secrets-via-env, using the redis Image, which exports password as
CONFIDENTIAL
Answer:
See the
solution below.
Explanation:
solution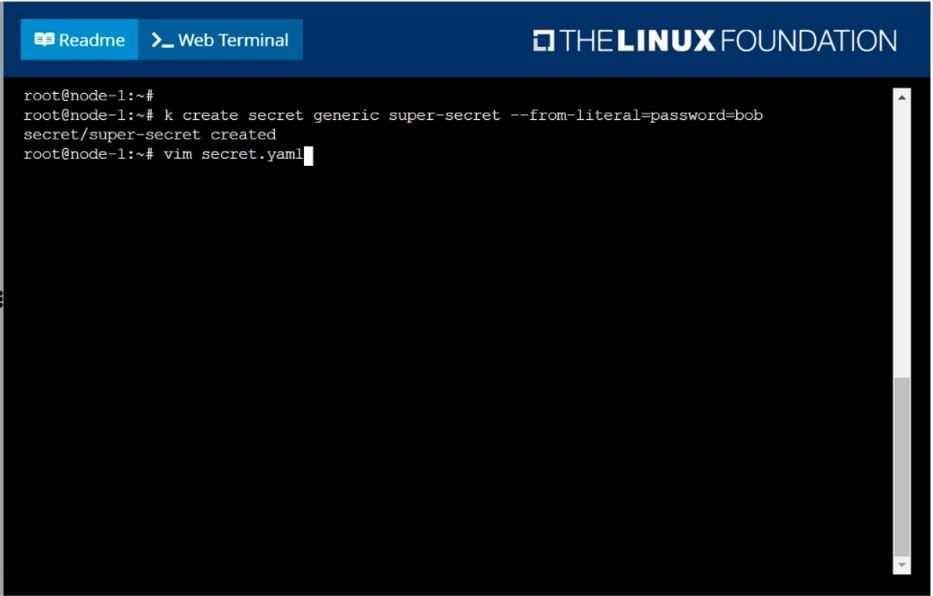
F:\Work\Data Entry Work\Data Entry\20200827\CKA\12 B.JPG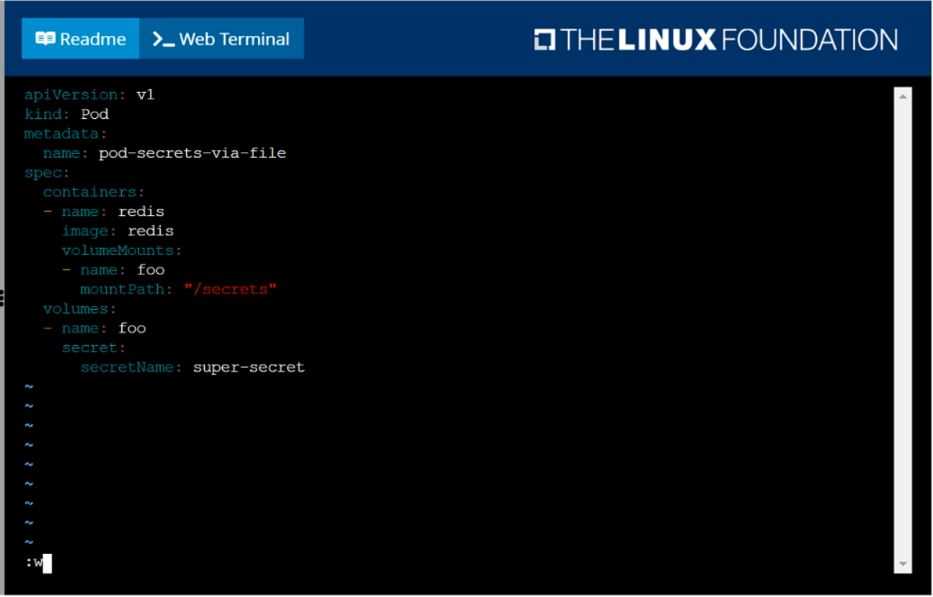
F:\Work\Data Entry Work\Data Entry\20200827\CKA\12 C.JPG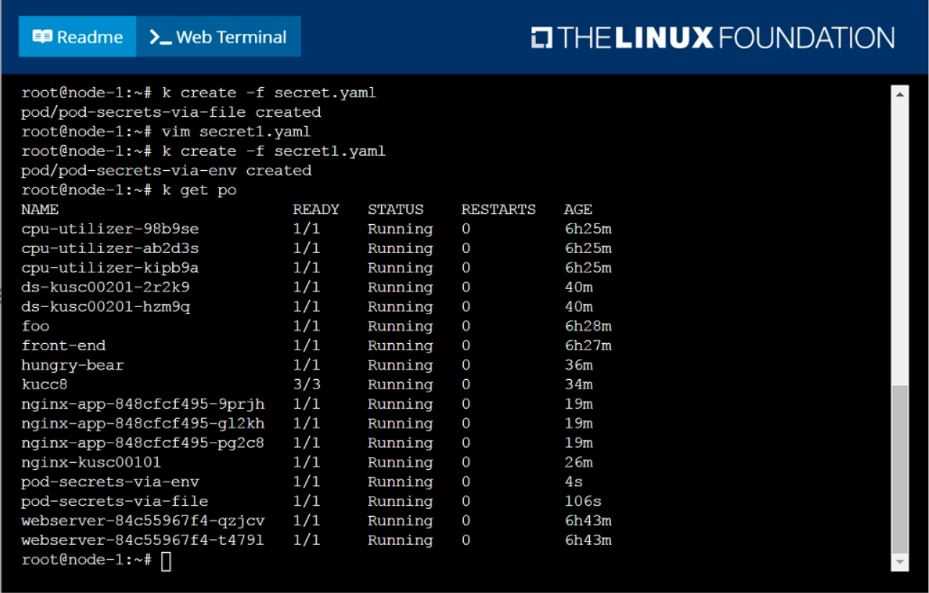
F:\Work\Data Entry Work\Data Entry\20200827\CKA\12 D.JPG
Question 13
SIMULATION
Create a pod as follows:
Name: non-persistent-redis
container Image: redis
Volume with name: cache-control
Mount path: /data/redis
The pod should launch in the staging namespace and the volume must not be persistent.
Answer:
See the
solution below.
Explanation:
solution
F:\Work\Data Entry Work\Data Entry\20200827\CKA\13 B.JPG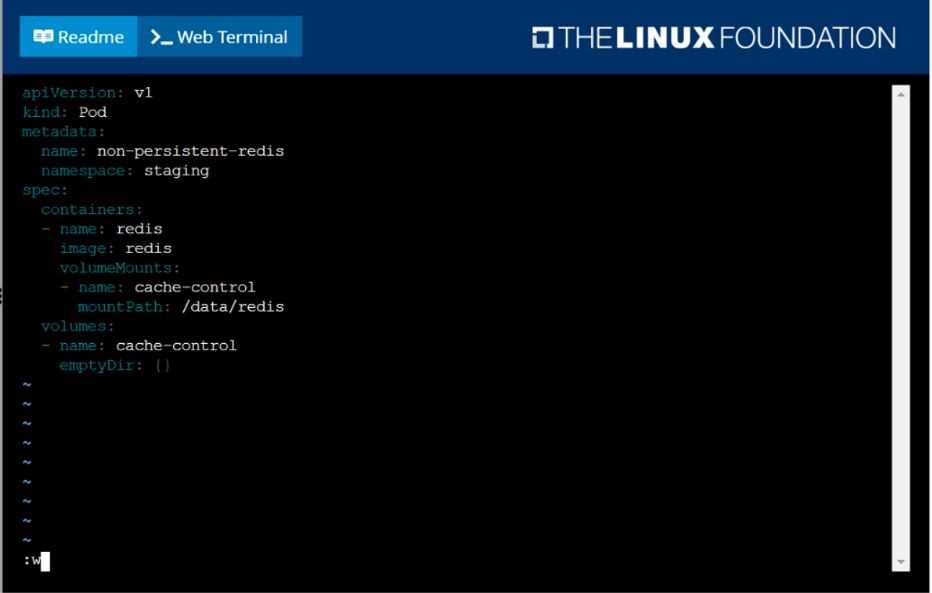
F:\Work\Data Entry Work\Data Entry\20200827\CKA\13 C.JPG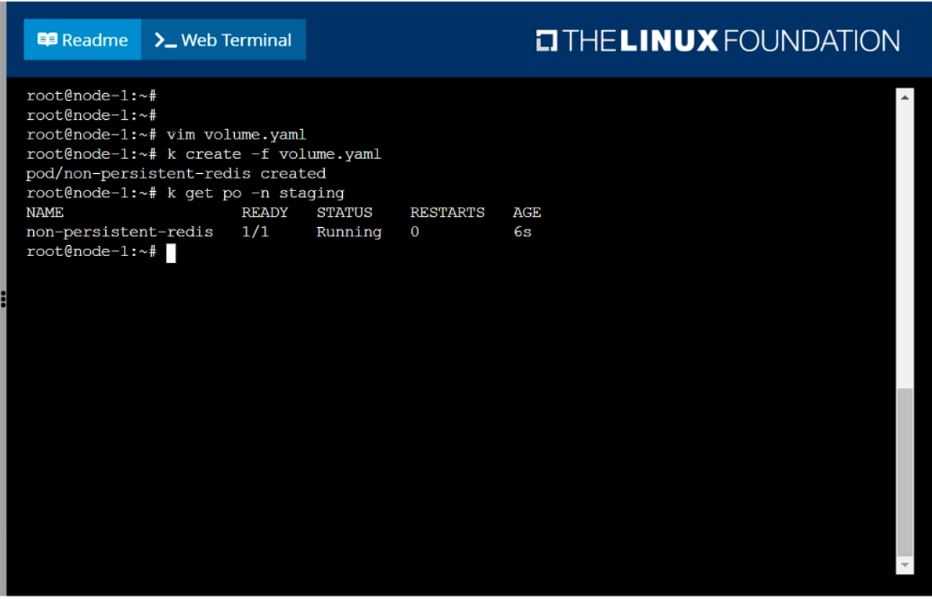
F:\Work\Data Entry Work\Data Entry\20200827\CKA\13 D.JPG
Question 14
SIMULATION
Scale the deployment webserver to 6 pods.
Answer:
See the
solution below.
Explanation:
solution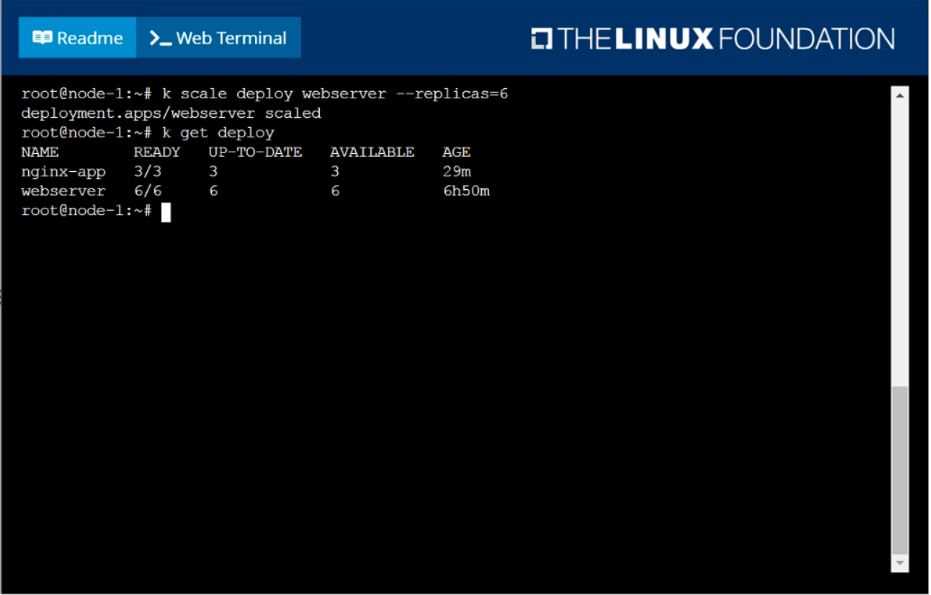
F:\Work\Data Entry Work\Data Entry\20200827\CKA\14 B.JPG
Question 15
SIMULATION
Check to see how many worker nodes are ready (not including nodes tainted NoSchedule) and write
the number to /opt/KUCC00104/kucc00104.txt.
Answer:
See the
solution below.
Explanation:
solution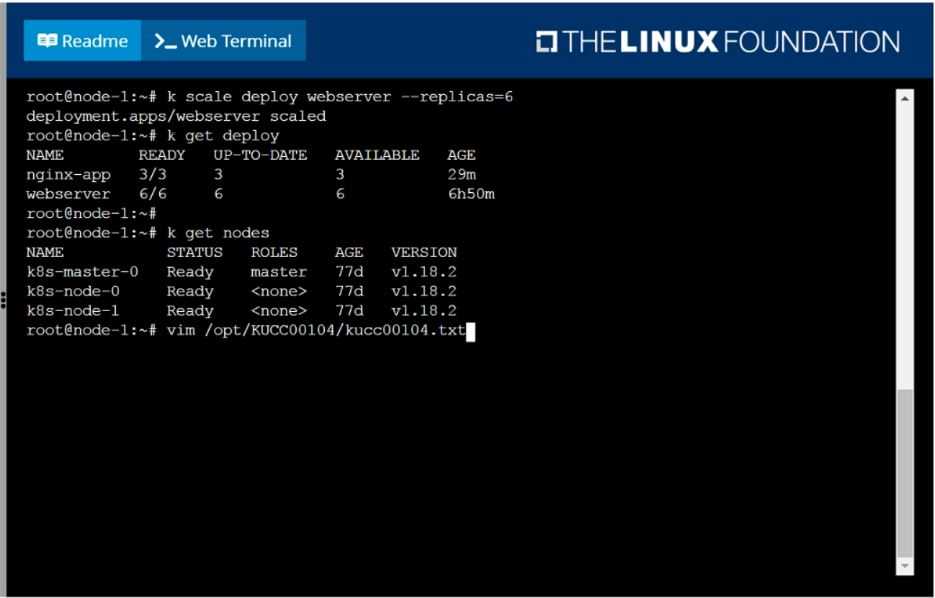
F:\Work\Data Entry Work\Data Entry\20200827\CKA\15 B.JPG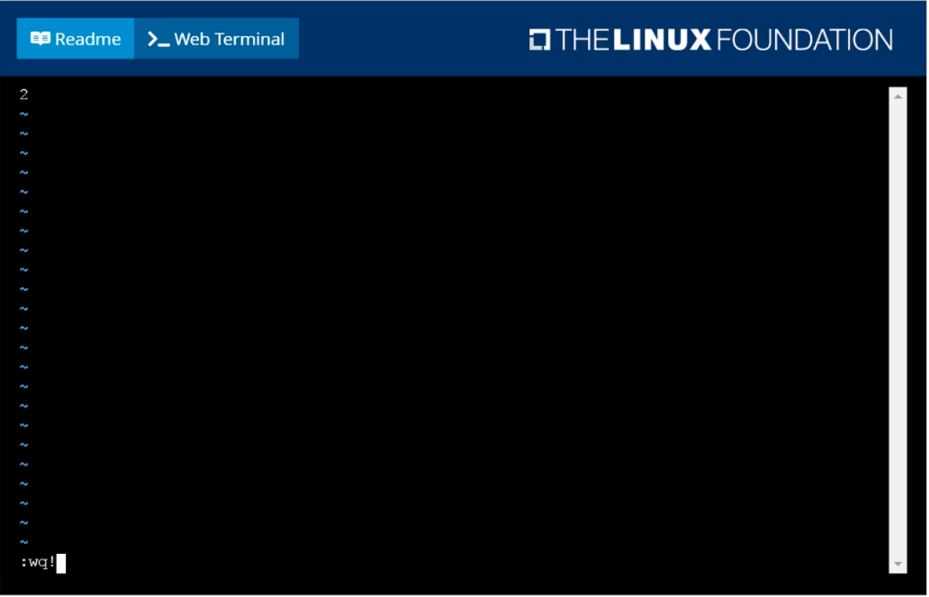
F:\Work\Data Entry Work\Data Entry\20200827\CKA\15 C.JPG